Monday, 20 November 2023

Change Client DNS with simple Script

This is a handy simple script to change DNS (test it before run in live environments;)) :


@echo off

:: Google DNS
set DNS1=8.8.8.8
set DNS2=8.8.4.4

for /f "tokens=1,2,3*" %%i in ('netsh int show interface') do (
    if %%i equ Enabled (
        echo Changing "%%l" : %DNS1% + %DNS2%
        netsh int ipv4 set dns name="%%l" static %DNS1% primary validate=no
        netsh int ipv4 add dns name="%%l" %DNS2% index=2 validate=no
    )
)

ipconfig /flushdns

:EOF

VBS script to open IE and go to webpage

Simple and handy .vbs script to open a webpage into a specific browser (in this case tested with the latest and greatest Microsoft Edge 😀) 


Set WshShell = WScript.CreateObject("WScript.Shell")
Return = WshShell.Run("msedge.exe https://sccmrookie.blogspot.com/", 1)

Tuesday, 6 December 2022

How To Create A Custom Role In Intune

In large organizations, multiple IT teams work on different projects and they need different rights. It does not make sense to provide Global administrator or Intune Service Administrator rights to everyone. That is why we have Intune Custom-based roles which can be created to handle different services. In this article, we will create a custom Intune role for the Help desk to wipe and sync the Intune devices.

Login to Endpoint Manager using  https://endpoint.microsoft.com/

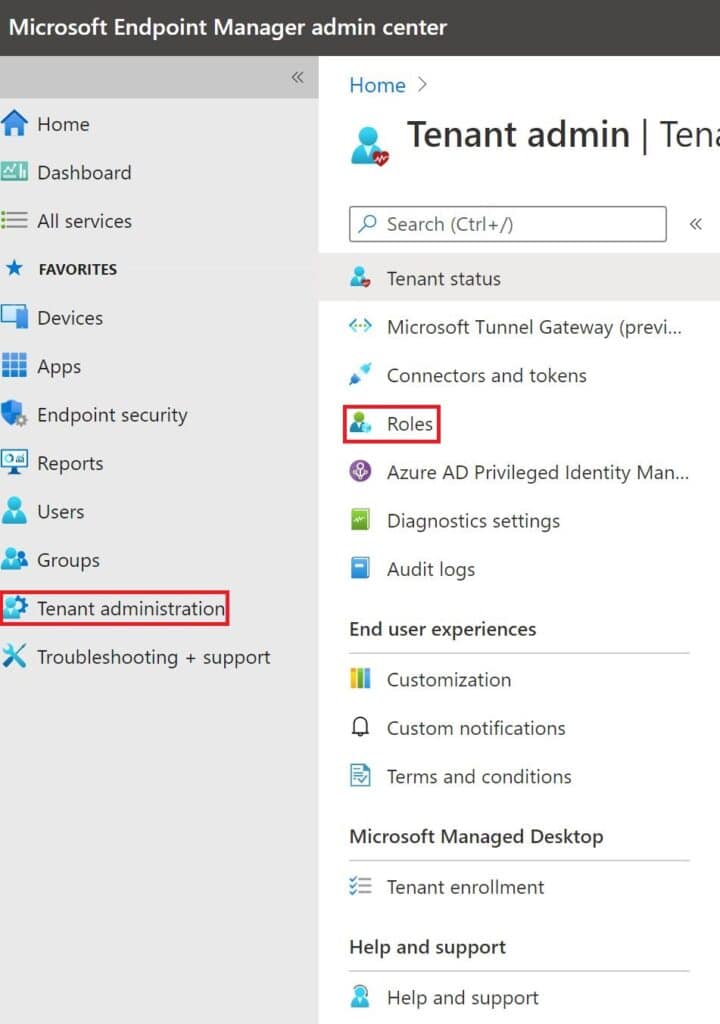
Select Tenant administration and Roles.
Tenant AdministrationSelect All Roles and create a new custom role in Intune.

Intune Custom role

Enter Intune custom role name

Intune Custom role

You need to select which permissions should be assigned to this role, in this article we will assign 2 permissions which are Wipe and Sync
Custom permissionsIntune Device Wipe


You can assign scope tags if you are using them.

Intune Scope tag

Review and create Intune custom role.
Intune Custom roleA New Intune role has been created and the next step is to assign the group.
new intune roleSelect the new role and select the assignment
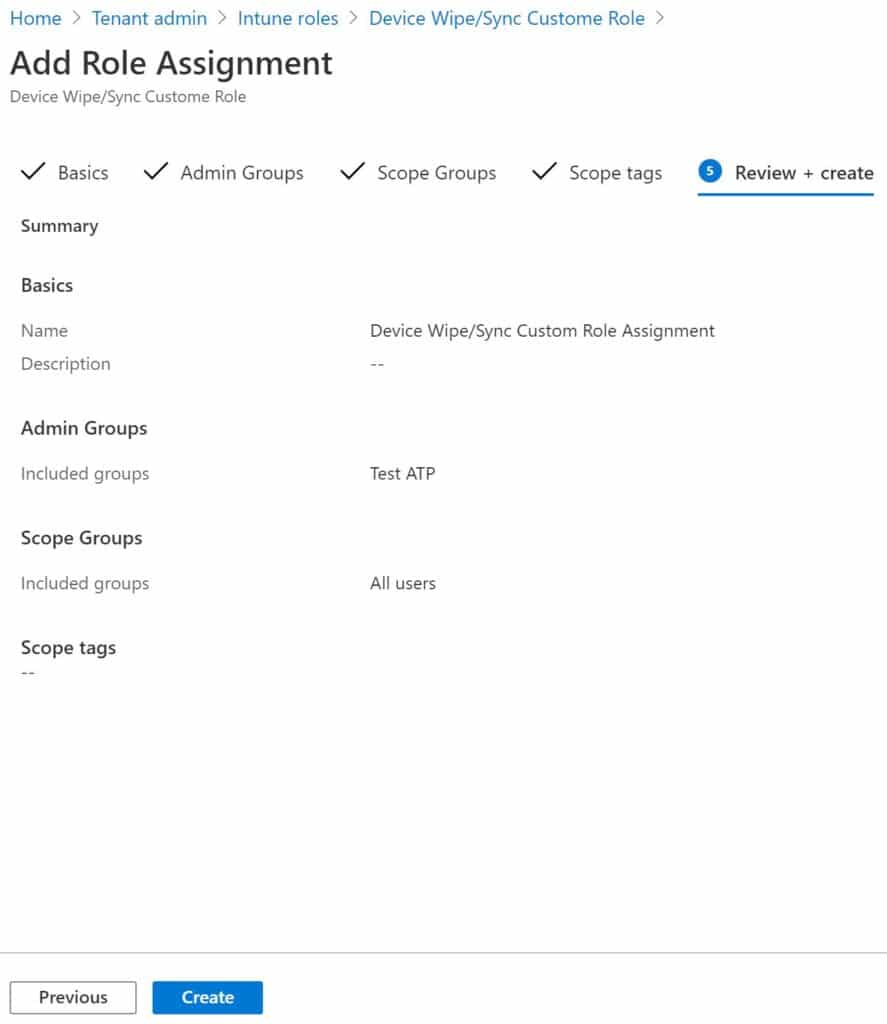
Intune role assignmentSelect assign and enter the name for the assignment of this new Intune role.
intune assignmentAssign the group which will have these role permissions
Intune groupAssign a scope group if you have created scope groups already or you can assign “Add all users” that will provide rights on all users’ devices in the tenant.

Intune scope group

Review  & create the assignment after reviewing all the settings.
Intune Custom role

Deploy CrowdStrike Falcon Agent Using Intune

 CrowdStrike is a cloud-based next-generation antivirus, EDR (endpoint detection and response) solution. You can deploy CrowdStrike in your infrastructure via a single lightweight agent. In this post, we will discuss how we can install CrowdStrike falcon agent / Sensor using Intune on Azure Ad joined devices.

CrowdStrike Intune

  • Use the following code in Install.cmd. You should use your own CID (Customer ID)

@ECHO OFF
SET ThisScriptsDirectory=%~dp0

WindowsSensor.LionLanner.exe /install /quiet /norestart CID=02A1C79U38044E2XXXXXXX-FA

CrowdStrike Falcon Agent Install Switches

CID=Customer ID Checksum, which is required when installing.
MAINTENANCE_TOKEN=Bulk Maintenance Token is retrieved from the CrowdStrike site when performing upgrades.
/installInstall the sensor (default).
/passiveThe installer shows a minimal UI with no prompts.
/quietThe installer shows no UI and no prompts.
/norestartPrevents the host from restarting at the end of the sensor installation.


  • Now create an Intune package using Intune Packaging App. (Change source path and destination folder path)

PS C:\IntuneAppsWinAppsUtil> .\IntuneWinAppUtil.exe

           Please specify the source folder: C:\CrowdStrike
           Please specify the setup file: Install.cmd
           Please specify the output folder: C:\CrowdStrike
           Do you want to specify catalog folder (Y/N)?N

Install CrowdStrike Intune

  • Select App Package file which we created earlier.

CrowdStrike Sensor Intune

  • Add app information such as Name & Publisher

Crowdstrike Deployment Intune

  •  Specify the commands to install and uninstall this app

Intune CrowdStrike Installation

  • Select both OS system architecture and minimum OS to Windows 10 1607

Falcon Agent Intune

  •  On detection rule, select “Manually configure detection rules and Rule type Register”

Intune Detection Rule

Path : C:\Program Files\CrowdStrike
File or folder : CSFalconController.exe

  • Assign to the group you want to deploy printer using Intune.
Install Google Chrome Using Intune

Google Chrome was developed and released by Google in 2008. It’s a quite popular browser on Microsoft Windows, Linux, MacOS. It also supports mobile devices such as Android and iOS. In today’s post, we will discuss how we can deploy or install Chrome browser using Intune on remote devices.

  • Go to the following URL and download “Chrome bundle for Windows 64-bit”

https://chromeenterprise.google/browser/download/

Intune Chrome Browser

  • Extract the zip file and find the file “GoogleChromeStandaloneEnterprise64.msi” in the Installer folder.
  • Navigate to Intune Endpoint Manager

https://endpoint.microsoft.com/

  • Select Apps and All Apps, then Click on Add App

Chrome Intune Deployment

  • Select App type as “Line-of-business app”

Install Chrome Intune

  • You can change Name and Description, Enter Publisher name

Chrome Intune Package

  • Select Scope tags if you are using tags

Intune Scope

  • Add group is required to install Chrome on devices

Intune Chrome Deployment

  • Click Create to start the deployment

Chrome Enterprise deployment

Wednesday, 7 October 2020

Tuesday, 4 February 2020

Microsoft Office 2013 Language Pack Application creation

This post is ment to help to set up Office 2013 language packages. In the example I used the German language pack.

First of all you have to set up the xml file with the setup configuration. This is the one I used:


Configuration Product=OMUI.de-de

    Display Level=none CompletionNotice=no SuppressModal=yes AcceptEula=yes 
   
    !-- Logging Type=standard Path=%temp% Template=Microsoft Office German Language Pack Setup().txt  --

    !-- USERNAME Value=Customer  --
   
    !-- COMPANYNAME Value=MyCompany  --
   
    !-- INSTALLLOCATION Value=%programfiles%Microsoft Office  --
   
    !-- LIS CACHEACTION=CacheOnly  --
   
    !-- LIS SOURCELIST=server1shareOffice;server2shareOffice  --
   
    !-- DistributionPoint Location=servershareOffice  --
   
    !-- OptionState Id=OptionID State=absent Children=force  --
   
    !-- Setting Id=SETUP_REBOOT Value=IfNeeded  --
   
    !-- Command Path=%windir%system32msiexec.exe Args=i serversharemy.msi QuietArg=q ChainPosition=after Execute=install  --

Configuration


Then you have to set up the .cmd that will run the setup from SCCM application:

setup.exe /config config.xml