Intune Multi Admin Approval: extra layer of security

Last week, attackers used compromised Microsoft Intune credentials to push a mass device wipe across Stryker's endpoints. Hundreds of managed devices were wiped in a single action — no MFA prompt, no second pair of eyes, no friction whatsoever. Just one compromised admin account and a policy that executed instantly.

This is not a novel attack vector. It is a predictable consequence of missing a control that Microsoft ships natively with Intune: Multi Admin Approval (MAA).

The Solution: MAA requires a second administrator to explicitly approve destructive actions before they execute. It takes about 5 minutes to configure. If Stryker had it enabled, the wipe would have sat in an approval queue instead of running.

What Is Intune Multi Admin Approval?

Multi Admin Approval is a built-in Intune governance control that adds a mandatory human approval step to high-impact actions. It directly breaks the single-account compromise attack pattern: even with full admin credentials, an attacker cannot execute a destructive action unilaterally.

What Actions MAA Covers

Action Description
Device wipeFactory resets the device, removing all data.
Device retireRemoves corporate data and unenrolls the device.
Device deleteRemoves the device record from Intune.
ScriptsPowerShell and shell script deployments.
App deploymentsRequired app assignments pushed to devices.

Critical caveat: Don't just protect "Wipe". Attackers will use scripts or retire commands if wipe is blocked. Configure all five policy types.

How to Configure Intune MAA

Step-by-Step Guide

  1. Navigate: Go to Tenant administration > Multi Admin Approval > Access policies.
  2. Create Policy: Click + Create. Use a clear name like MAA - Device Wipe.
  3. Select Type: Under Profile type, select Device wipe. (Repeat for other types later).
  4. Add Approvers: Select a security group containing your designated approvers.
    • Best Practice: Use a dedicated group with at least two members.
  5. Submit: Enter a business justification and click Submit.
  6. Final Approval: A second admin must approve this new policy in the Pending approvals tab before it becomes active.

What Happens When MAA Is Active

When an admin initiates a wipe, the action is held. Approvers receive an email and must review the request (Device name, initiator, and justification) in the portal. If denied or ignored, the action is automatically cancelled.

What MAA Does Not Cover

MAA is a strong control but it does not protect everything. It currently excludes:

  • Compliance policy changes
  • Conditional Access modifications
  • Configuration profile deletions
  • Bulk operations via Graph API (potential bypass)
Pro Tip: Complement MAA with Privileged Identity Management (PIM) and Microsoft Sentinel alerts for real-time monitoring of admin policy changes.

Frequently Asked Questions

Does MAA apply to bulk actions?
Yes. If an admin initiates a wipe on multiple devices, the entire batch is held. This is exactly what would have stopped the Stryker attack.

Can I approve my own requests?
No. Self-approval is blocked by Intune logic.

Is it available on my license?
MAA requires Intune Plan 1 (M365 E3/E5, Business Premium, etc.).

Check your configuration against our checklist:

  • ✅ Device Wipe, Retire, Delete policies active
  • ✅ Scripts and Apps policies active
  • ✅ Approver group has 2+ members
READ MORE »

How to Deploy Defender for Endpoint on macOS Using Intune

Managing Apple devices in a Windows-centric enterprise environment has become a top priority. In this guide, we will walk through how to configure and deploy Microsoft Defender for Endpoint (MDE) on macOS using Microsoft Intune, ensuring full protection and seamless integration into your security portal.

Prerequisites: Ensure your macOS devices are already enrolled in Intune and the "Microsoft Defender for Endpoint" connector is enabled under Endpoint Security.

1. System Extensions Configuration

macOS requires explicit approval for the extensions that Defender uses to monitor the system. Without this, the app won't have the necessary permissions to scan the device.

  • Create a new Configuration Profile (Settings Catalog).
  • Search for System Extensions and add the following identifiers (Team ID: UBF8T346G9):
    • com.microsoft.wdav.epsext
    • com.microsoft.wdav.netext

2. Configuration via .mobileconfig Files

Many Defender settings on Mac must be uploaded via custom configuration files. These templates handle critical security permissions that cannot be toggled manually by users:

  • Network Filter: Allows Defender to monitor and filter network traffic.
  • Full Disk Access: Mandatory for Defender to scan system files and detect threats.
  • Background Services: Ensures Defender processes run correctly at startup.

Tip: Always download the latest .mobileconfig templates from the official Microsoft GitHub repository and upload them as "Custom" profiles in Intune.

3. Microsoft AutoUpdate (MAU)

To keep Defender updated without user intervention, we need to configure the Microsoft AutoUpdate service.

By creating a custom profile and uploading the MAU XML configuration, you can define the update "channel." For most enterprise environments, setting this to Production is the standard, though you can use Preview for testing groups.

4. EDR Policy (Endpoint Detection and Response)

This is a step often missed by administrators. Even if the app is installed, the device needs an EDR policy to correctly "check-in" with the Microsoft Defender portal.

  1. Go to Endpoint Security > Endpoint Detection and Response.
  2. Create a policy for macOS and assign it to your target device groups.

5. App Deployment and Onboarding

The final step is installing the software and "linking" it to your specific tenant:

  • App Deployment: In Intune, go to Apps > macOS and add the built-in "Microsoft Defender for Endpoint" app.
  • Onboarding Package: Download the onboarding
READ MORE »

Stop Personal PCs from Enrolling into Intune: The New Setting Explained

One of the most common (and frustrating) issues for an IT Administrator is finding the Microsoft Intune inventory cluttered with employees' personal devices.

This often happens because a user, while trying to access Outlook or OneDrive from their home PC, clicks "Yes" to a system prompt without reading the implications. In this article, we’ll explore a new feature that puts an end to this accidental enrollment scenario.

Note: This feature is currently in public preview but is highly recommended for production environments to maintain a clean inventory.

The Problem: Accidental MDM Enrollment

When a user adds a work or school account to a personal Windows device, they often encounter the message: "Allow my organization to manage my device". By clicking Yes:

  • The PC is registered in Microsoft Entra ID.
  • The device is automatically enrolled in Intune (MDM).
  • Corporate policies (e.g., mandatory BitLocker encryption) are applied to a private PC, often catching the user off guard.

This creates privacy concerns for the user and unnecessary "noise" in the corporate device inventory.

The Solution: Disable Automatic MDM Enrollment

Microsoft has introduced a specific toggle to block MDM enrollment while still allowing the account to be registered for app access (Entra Registration).

How to Enable the Feature:

  1. Log in to the Microsoft Intune Admin Center.
  2. Navigate to Devices > Enrollment.
  3. Select Windows enrollment > Automatic Enrollment.
  4. Look for the new option: "Disable MDM enrollment when adding work or school account on Windows".
  5. Set the toggle to Yes and click Save.

What Changes for the User?

With this policy active, the user experience changes significantly:

  • The second prompt (asking to manage the device) no longer appears.
  • The device will still show as "Registered" in Entra ID (to allow for Conditional Access), but the MDM state will remain as "None".
  • In the PC settings (Accounts > Access work or school), the account will appear, but without the "Info" button typical of an MDM-enrolled device.

Why You Should Enable It Now

Unless your organization explicitly supports BYOD (Bring Your Own Device) scenarios with full Intune management, there is no reason to let users enroll their private PCs.

Key Benefits:

  • Clean Inventory: Keep Intune focused on corporate-owned assets.
  • Fewer Help Desk Tickets: Prevent users from getting locked out by policies on personal hardware.
  • Security: Maintain the benefits of Entra Registration for identity-based security.

Step 1: Accessing Intune Roles

1. Login to the Microsoft Endpoint Manager admin center at endpoint.microsoft.com.

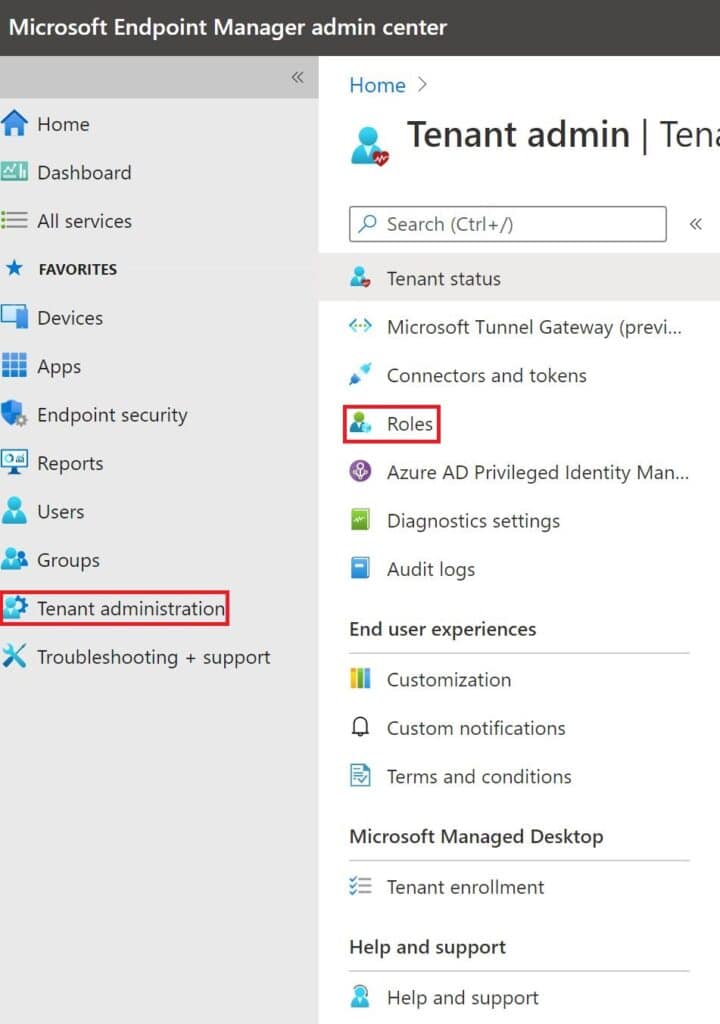
2. Navigate to Tenant administration > Roles.

Tenant Administration Navigation

Step 2: Create a New Custom Role

1. Select All roles and click on + Create.

Create Intune Custom role

2. On the Basics page, enter a Name (e.g., Help Desk - Wipe and Sync) and an optional description.

Role Basics

Step 3: Configure Permissions

Now, select the specific permissions for this role. For this scenario, we will assign:

  • Remote tasks: Wipe
  • Remote tasks: Sync devices
Custom permissions

Click Next. You can assign Scope Tags if your organization uses them to filter objects.

Step 4: Role Assignment

Creating the role is only half the work. Now you must assign it to the IT Staff group:

1. Select the newly created role and click on Assignments > + Assign.

Intune role assignment

2. Enter an assignment name and select the Admin Group (the group containing your Help Desk members).

3. Select the Scope Group: You can select a specific group of devices they can manage, or select "All Users/All Devices" to provide rights across the entire tenant.

Intune scope group
Success! Review the settings and click Create. Your Help Desk team now has a dedicated custom role to manage basic device tasks securely.
READ MORE »

Deploy CrowdStrike Falcon Agent Using Intune

CrowdStrike Falcon is a cloud-native, next-generation antivirus and Endpoint Detection and Response (EDR) solution. It utilizes a single, lightweight agent to protect your infrastructure. In this guide, we will walk through the deployment of the CrowdStrike Falcon Sensor using Microsoft Intune on Azure AD joined devices.

Step 1: Preparation

  • Login to the CrowdStrike Portal and download the sensor installer.
  • Refer to the official CrowdStrike documentation for detailed download instructions.
  • Place the installer in a dedicated folder (e.g., C:\CrowdStrike) and create a file named Install.cmd.
CrowdStrike Intune Folder Structure

The Installation Script

Paste the following code into your Install.cmd file. Ensure you replace the CID with your own Customer ID.

@ECHO OFF
SET ThisScriptsDirectory=%~dp0
WindowsSensor.LionLanner.exe /install /quiet /norestart CID=YOUR_CID_HERE

Command Line Switches

Switch Description
CID=Customer ID Checksum (Required).
/installInstalls the sensor.
/quietNo UI or prompts.
/norestartPrevents forced reboot.

Step 2: Package the App (Win32)

Use the Microsoft Win32 Content Prep Tool to create the .intunewin file.

.\IntuneWinAppUtil.exe
Source folder: C:\CrowdStrike
Setup file: Install.cmd
Output folder: C:\CrowdStrike

Step 3: Deploy via Intune

  1. Login to Microsoft Intune Admin Center.
  2. Go to Apps > All Apps > Add.
  3. Select Windows app (Win32) and upload your .intunewin file.
Intune App Selection

App Configuration

  • Program: Install command: Install.cmd | Uninstall command: WindowsSensor.LionLanner.exe /uninstall.
  • Requirements: Operating system architecture: x64 | Minimum OS: Windows 10 1607.
  • Detection Rule: Manually configure detection rules.
    • Rule type: File
    • Path: C:\Program Files\CrowdStrike
    • File or folder: CSFalconController.exe
IT Pro Tip: Always test the deployment on a small pilot group of devices before assigning it to the entire "All Devices" group to ensure the CID is active and the sensor communicates correctly with the CrowdStrike console.
READ MORE »

Install Google Chrome Using Intune

Google Chrome was developed and released by Google in 2008. It’s a quite popular browser on Microsoft Windows, Linux, MacOS. It also supports mobile devices such as Android and iOS. In today’s post, we will discuss how we can deploy or install Chrome browser using Intune on remote devices.

  • Go to the following URL and download “Chrome bundle for Windows 64-bit”

https://chromeenterprise.google/browser/download/

Intune Chrome Browser

  • Extract the zip file and find the file “GoogleChromeStandaloneEnterprise64.msi” in the Installer folder.
  • Navigate to Intune Endpoint Manager

https://endpoint.microsoft.com/

  • Select Apps and All Apps, then Click on Add App

Chrome Intune Deployment

  • Select App type as “Line-of-business app”

Install Chrome Intune

  • You can change Name and Description, Enter Publisher name

Chrome Intune Package

  • Select Scope tags if you are using tags

Intune Scope

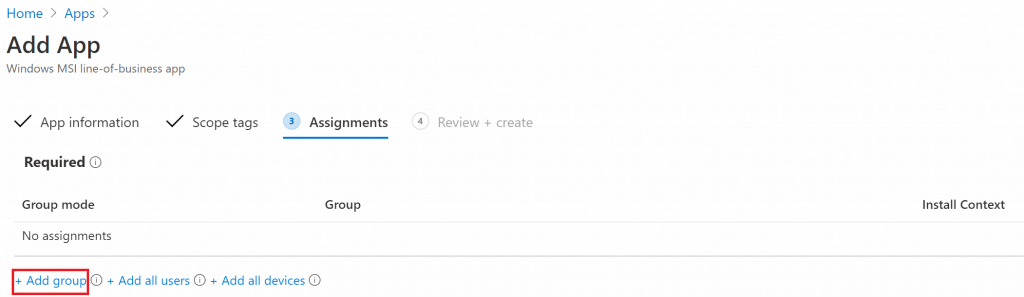
  • Add group is required to install Chrome on devices

Intune Chrome Deployment

  • Click Create to start the deployment

Chrome Enterprise deployment

READ MORE »