Microsoft Office 2013 Language Pack Application creation

This post is ment to help to set up Office 2013 language packages. In the example I used the German language pack.

First of all you have to set up the xml file with the setup configuration. This is the one I used:


Configuration Product=OMUI.de-de

    Display Level=none CompletionNotice=no SuppressModal=yes AcceptEula=yes 
   
    !-- Logging Type=standard Path=%temp% Template=Microsoft Office German Language Pack Setup().txt  --

    !-- USERNAME Value=Customer  --
   
    !-- COMPANYNAME Value=MyCompany  --
   
    !-- INSTALLLOCATION Value=%programfiles%Microsoft Office  --
   
    !-- LIS CACHEACTION=CacheOnly  --
   
    !-- LIS SOURCELIST=server1shareOffice;server2shareOffice  --
   
    !-- DistributionPoint Location=servershareOffice  --
   
    !-- OptionState Id=OptionID State=absent Children=force  --
   
    !-- Setting Id=SETUP_REBOOT Value=IfNeeded  --
   
    !-- Command Path=%windir%system32msiexec.exe Args=i serversharemy.msi QuietArg=q ChainPosition=after Execute=install  --

Configuration


Then you have to set up the .cmd that will run the setup from SCCM application:

setup.exe /config config.xml


READ MORE »

Install ConfigMgr 2012 SP2 and R2 SP1 Cumulative Update 1


The latest cumulative update for ConfigMgr 2012 SP2 and R2 SP1 CU1 was released on 04.08.15. Here’s the tutorial to install the hotfix.( here you have more info: 
http://bit.ly/1UleYM7


Download the hotfix from here https://support.microsoft.com/en-us/kb/3074857
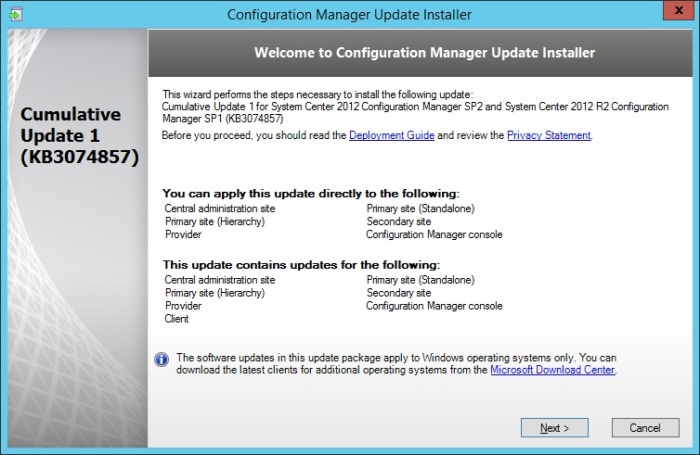
Unzip the .zip file and execute the CM12_SP2R2SP1CU1-KB3074857-X64-ENU.exe.
Click Next.

R2SP1CU1-001
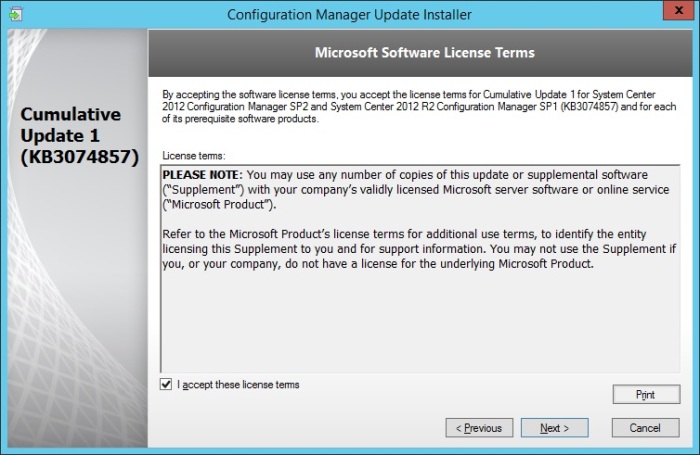
Accept the licence terms and click Next.
R2SP1CU1-002
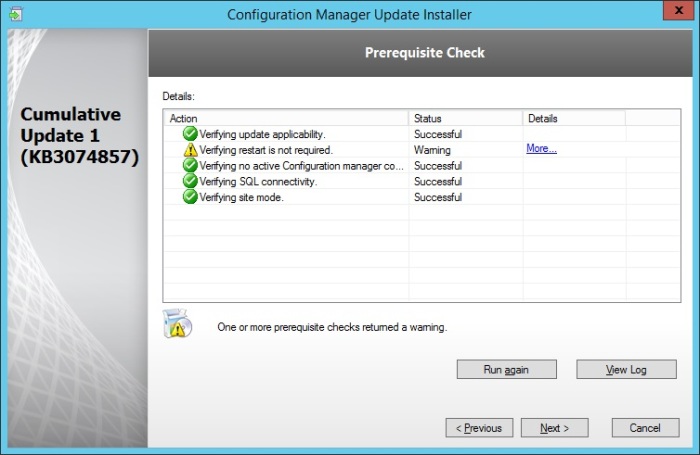
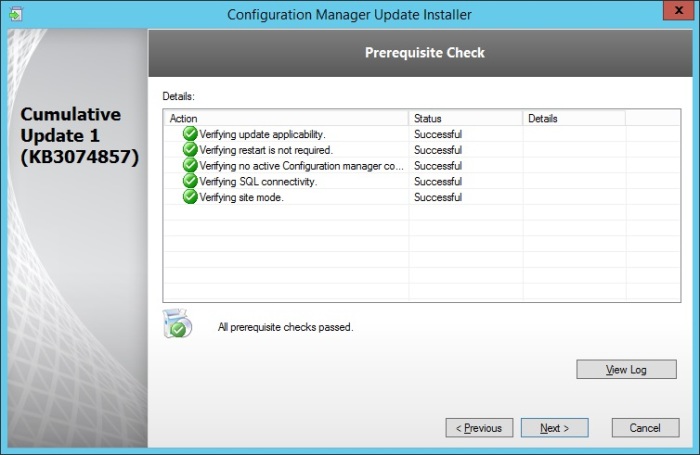
Address anything in the pre-req check.
R2SP1CU1-003
R2SP1CU1-004
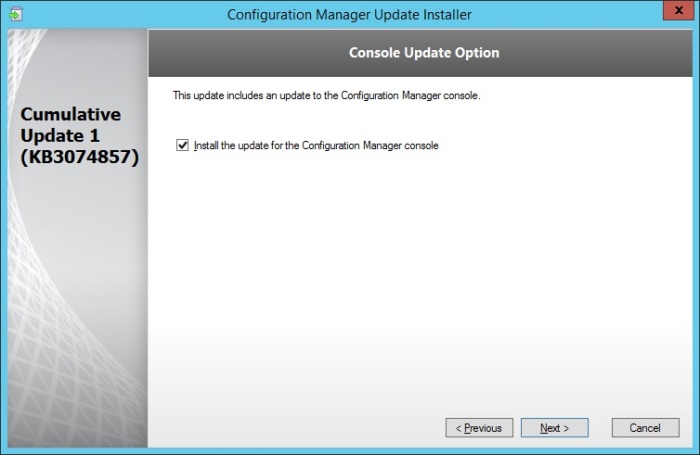
Update the console
R2SP1CU1-005
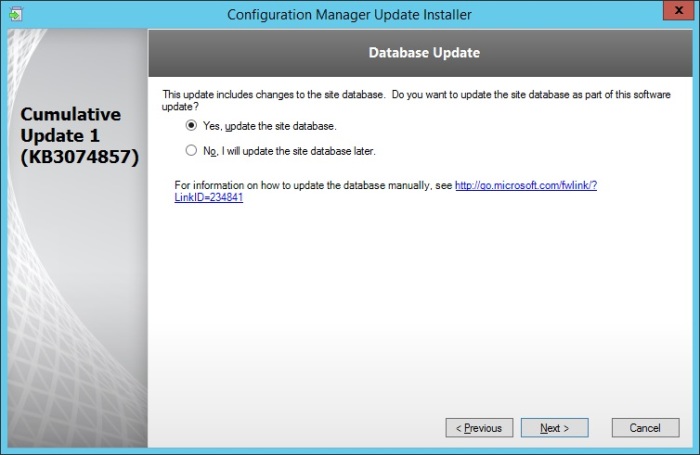
Update the site database
R2SP1CU1-006
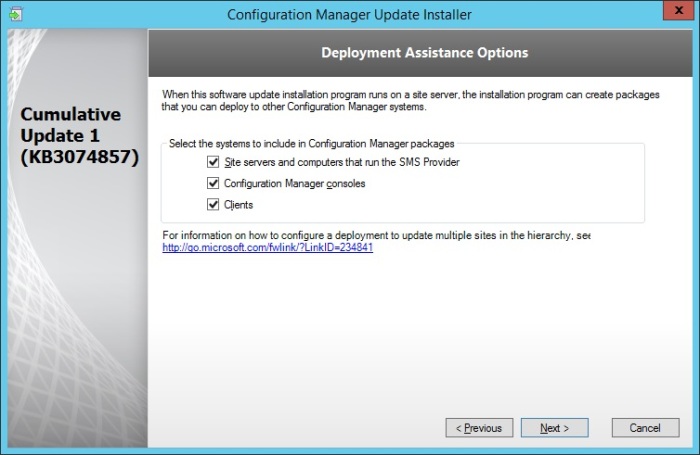
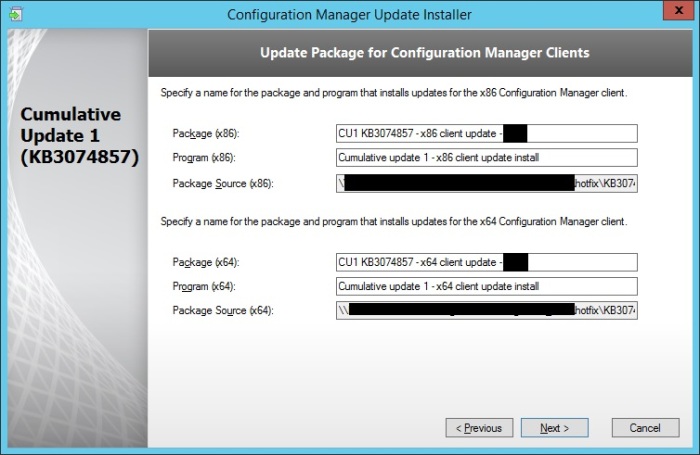
Create the deployment packages.
R2SP1CU1-007
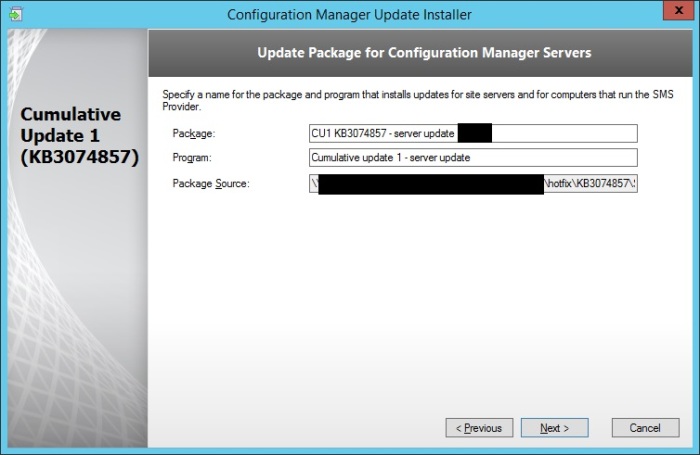
Click Next
R2SP1CU1-008
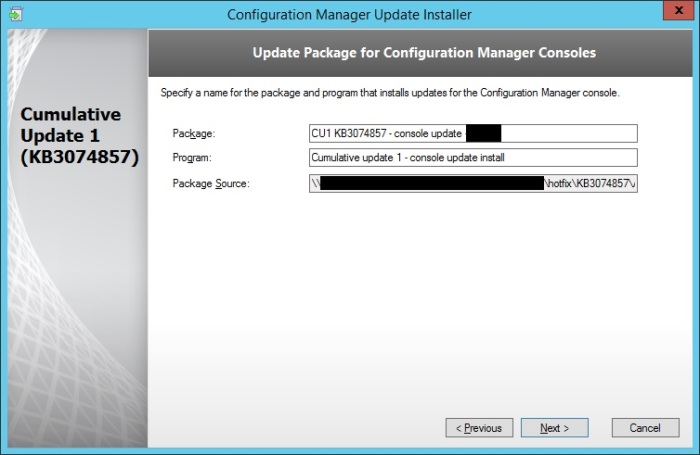
Click Next
R2SP1CU1-009
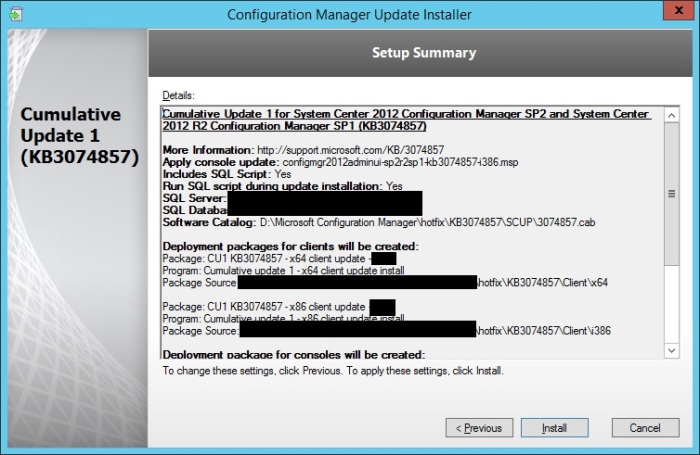
Click Next
R2SP1CU1-010
Click Install
R2SP1CU1-011
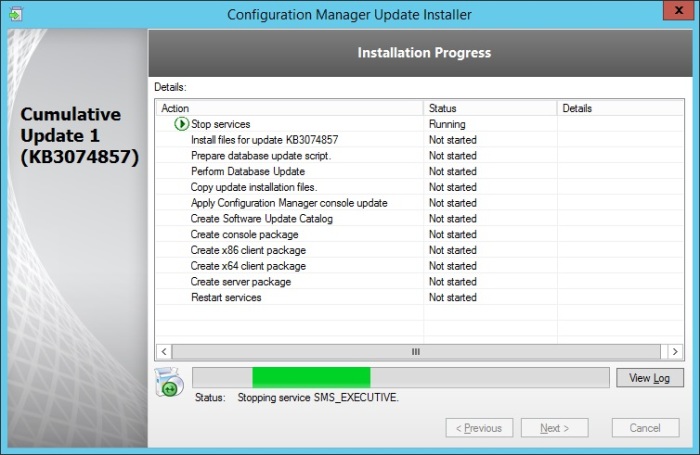
The update process will commence.
R2SP1CU1-012
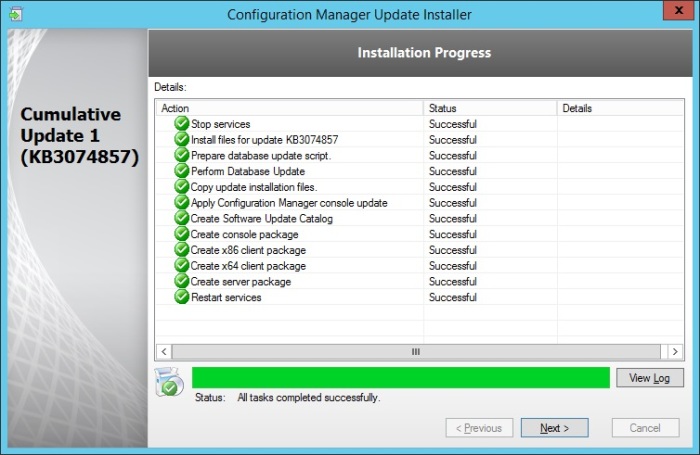
Looking good! Click Next.
R2SP1CU1-013
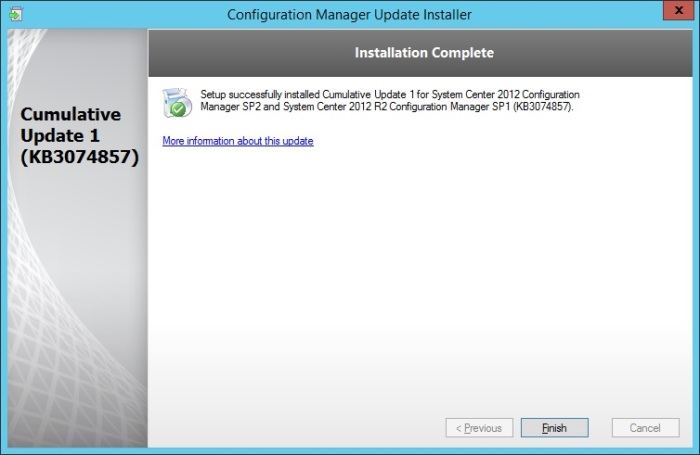
Click Finish to complete the installation.
R2SP1CU1-014
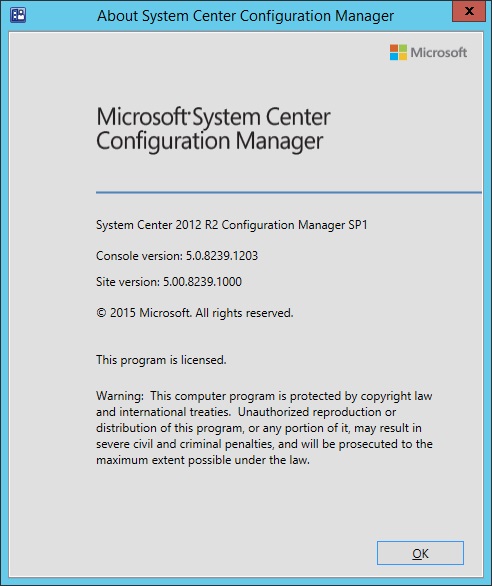
You will now be running version 5.0.8289.1203 console and client versions.
R2SP1CU1-015

That's it.
READ MORE »

Computers with 30 days old hardware information

Yeah, I have the blog as well. Ok I guess it's time to refresh the content with some updated scripts for SCCM 2016. I'll try to add some more deployment content as well down the road.


select 
SMS_R_SYSTEM.ResourceID, 
SMS_R_SYSTEM.ResourceType, 
SMS_R_SYSTEM.Name, SMS_R_SYSTEM.SMSUniqueIdentifier,
SMS_R_SYSTEM.ResourceDomainORWorkgroup, 
SMS_R_SYSTEM.Client from SMS_R_System
inner join SMS_G_System_COMPUTER_SYSTEM on SMS_G_System_COMPUTER_SYSTEM.ResourceID = SMS_R_System.ResourceId
where SMS_G_System_COMPUTER_SYSTEM.Name  not in (select SMS_R_System.Name
from SMS_R_System inner join SMS_G_System_WORKSTATION_STATUS on SMS_G_System_WORKSTATION_STATUS.ResourceID = SMS_R_System.ResourceId
where SMS_G_System_WORKSTATION_STATUS.LastHardwareScan >=  DateAdd(dd,-30,GetDate()))
READ MORE »

WMI Query to Find All Laptops and Desktops


gwmi -class win32_computersystem | select  PCSystemType  | Format-List


ValueSystem Type
0Unspecified
1Desktop
2Mobile
3Workstation
4Enterprise Server
5Small Office and Home Office (SOHO) Server
6Appliance PC
7Performance Server
8Maximum
READ MORE »

How to find duplicate objects in SCCM


Following you have some useful reports to be able to deal with duplicated objects in SCCM:
Duplicate MAC Addresses.
I normally see this in environments where VDI is common. Generally, a VDI admin has duplicated machines without giving each a unique MAC address. This is bad and should be avoided. If you’re VDI admin has created a bunch of computers with the same MAC, we need to delete them from SCCM. To find these objects, run the following TSQL query:

SELECT 
dbo.v_RA_System_MACAddresses.MAC_Addresses0,
Count(dbo.v_R_System.Name0) AS SystemCount 
FROM dbo.v_R_System RIGHT OUTER JOIN dbo.v_RA_System_MACAddresses 
ON dbo.v_R_System.ResourceID = dbo.v_RA_System_MACAddresses.ResourceID 
GROUP BY dbo.v_RA_System_MACAddresses.MAC_Addresses0 ORDER BY SystemCount DESC
Duplicate Computer Names.
These are the most common duplicate objects. Most likely this occurs due to OSD or conflicting discovery cycles. We basically end up with two computer objects, with the same name/hardware/MAC but different SMSBIOSGUID. It causes much confusion for ConfigMgr because it often doesn’t know how to process the inventory for the phantom object. To find these objects, create an SCCM Query (or query based collection) with the following Query Statement:

select R.ResourceID,
R.ResourceType,
R.Name,R.SMSUniqueIdentifier,
R.ResourceDomainORWorkgroup,R.Client from SMS_R_System as r 
full join SMS_R_System as s1 on s1.ResourceId = r.ResourceId 
full join SMS_R_System as s2 on s2.Name = s1.Name 
where s1.Name = s2.Name and s1.ResourceId != s2.ResourceId

Duplicate HardwareID’s
One other way to look for dupes is to use the HardwareID. Use the following TSQL to find the objects with duplicate HardwareIDs:

SELECT Name0, Hardware_ID0, Count(Hardware_ID0) AS SystemCount
FROM dbo.v_R_System
GROUP BY Hardware_ID0, Name0
ORDER BY SystemCount DESC


READ MORE »

Query for Workstations with low disk space (less than 5GB)


select
  SMS_R_SYSTEM.ResourceID,
SMS_R_SYSTEM.ResourceType,
SMS_R_SYSTEM.Name,
SMS_R_SYSTEM.SMSUniqueIdentifier,
SMS_R_SYSTEM.ResourceDomainORWorkgroup,
SMS_R_SYSTEM.Client ,
SMS_G_System_LOGICAL_DISK.FreeSpace,
SMS_G_System_LOGICAL_DISK.Size
from 
SMS_R_System 
inner join SMS_G_System_LOGICAL_DISK on SMS_G_System_LOGICAL_DISK.ResourceID = SMS_R_System.ResourceId

where
SMS_G_System_LOGICAL_DISK.FreeSpace < 5000
READ MORE »

CcmSetup failed with error code 0x80070307 Windows 10


CcmSetup failed with error code 0x80070307

When testing the latest Build of Windows 10 I got an error installing the Configuration Manager 2012 R2 client, it fails installing the Windows Update agent with the following error in the CCMSetup.log file.

“File ‘C:\WINDOWS\ccmsetup\WindowsUpdateAgent30-x64.exe’ returned failure exit code 775. Fail the installation.”


I assume a solution to this error will presented soon, but I cannot wait to get started with my testing of 10049 so installing the SCCM Client with the following command line solves at least the installation error of the Configuration Manager client.


- ccmsetup.exe  /skipprereq:WindowsUpdateAgent30-x86.exe

- ccmsetup.exe  /skipprereq:WindowsUpdateAgent30-x64.exe

Then ccmsetup.exe will skip the installation of the Windows Update Agent and continue the installation anyway. Normally I use the /Skipprereq: command to skip the installation of Silverlight on servers as I don’t want Silverlight installed on my servers. But the command line works great in this case as well.

You will then see this in the ccmsetup.log file on the client which shows that the installation of the Windows Update agent was skipped and that the installation continues.


“Item ‘x64/WindowsUpdateAgent30-x64.exe’ is excluded by the ‘/skipprereq:’ switch. Ignore it.”


God Luck with the testing of Windows 1o!


Update: SCCM 2012 SP2 and SCCM 2012 R2 Sp1 solves the problem so to solve the issue and get OSD working an upgrade is needed. If you just want the client to work and cannot upgrade now, the workaround is valid for newer releases of Windows 10 as well
.
READ MORE »

SCCM Query computers inactive 45days


This is a query to find out all the Workstations that are been inactive for the last 45 days 
select 
SMS_R_SYSTEM.ResourceID,
SMS_R_SYSTEM.ResourceType,
SMS_R_SYSTEM.Name,
SMS_R_SYSTEM.SMSUniqueIdentifier,
SMS_R_SYSTEM.ResourceDomainORWorkgroup,
SMS_R_SYSTEM.Client from SMS_R_System where SMS_R_System.Name in (select Name from SMS_R_System where ((DATEDIFF(day, SMS_R_SYSTEM.AgentTime, getdate()) >=45) and AgentName = "SMS_AD_SYSTEM_DISCOVERY_AGENT")) and SMS_R_System.Name in (select Name from SMS_R_System where ((DATEDIFF(day, SMS_R_SYSTEM.AgentTime, getdate()) >=45) and AgentName = "Heartbeat Discovery"))
READ MORE »

SCCM Device Collection for Windows 10 Computers


Query


As many companies are migrating to Windows 10, here you have the query to find them in your SCCM.


select 
SMS_R_SYSTEM.ResourceID,
SMS_R_SYSTEM.ResourceType,
SMS_R_SYSTEM.Name,
SMS_R_SYSTEM.SMSUniqueIdentifier,
SMS_R_SYSTEM.ResourceDomainORWorkgroup,
SMS_R_SYSTEM.Client from SMS_R_System inner join SMS_G_System_OPERATING_SYSTEM on SMS_G_System_OPERATING_SYSTEM.ResourceId = SMS_R_System.ResourceId where SMS_G_System_OPERATING_SYSTEM.BuildNumber = "10240"
READ MORE »

SCCM 2012 – Options for Removing Windows Updates


Recently, a client had an issue with a particular patch to Office interfering with a line of business application.  The patch in particular was KB 2826026 – Office 2010 update: October 8, 2013.  Normally the procedure to uninstall a patch is to use Group Policy or SCCM to push out the following Windows Update Stand Alone tool command:


WUSA /uninstall /kb:2826026
However this only works with Windows Operating System Updates (which are deployed in the MSU format).  When dealing with a software product update like this one for Office, the correct answer is to look in the registry for information about the update.
Browse to: HKEY_LOCAL_MACHINE\SOFTWARE\Microsoft\Windows\CurrentVersion\Uninstall\, and then search for the KB number of the update you need to remove.  Once found, look at the Uninstall String, and you’ll see a value like this:


"C:\Program Files\Common Files\Microsoft Shared\OFFICE14\Oarpmany.exe" /removereleaseinpatch "{90140000-0011-0000-0000-0000000FF1CE}" "{D7D96A96-F61F-48AD-B2DC-4F4B6938D2AB}" "1033" "0"
This command will remove the offending patch, but requires manual intervention (clicking Yes) and then will force a restart.  You can use these values with an MSIexec command though to run the removal of the patch through Windows Installer, which will allow for logging and standard reboot controls, etc.
Use this example to help you create your MSI command:

msiexec /package {90140000-0011-0000-0000-0000000FF1CE} MSIPATCHREMOVE={D7D96A96-F61F-48AD-B2DC-4F4B6938D2AB} /qb /norestart /l+ c:\windows\system32\ccm\logs\KB2826026_unins.txt
This may force the shutdown of Office, and will not complete until the system has restarted, however.
READ MORE »

Deploying Microsoft Office 2003


Deploying Microsoft Office 2003 on a single machine isn't that difficult, but it can take some time. Just think how much more difficult when you have to deploy installing Microsoft Office 2003 can be on dozens of machine. To make things easier, Microsoft created the Custom Installation Wizard (CIW). Here's how it works.

What it does

The Custom Installation Wizard lets you create Windows Installer Transform files, or MST files for Office 2003. The files work with the original MSI installation package so that you don't need to modify it. It's called a transform file because it "transforms" the original MSI into your desired package.
In this way you are able to create custom installations for different groups of users. For example, an accounting group might install Access, while an administrative assistant group may not need it or PowerPoint. Different users, in addition, will likely require different security settings. To wit: VBA support may be allowed for IT staff, but not for assistants.
When creating a custom MST, you can specify additional setup files to chain, such as adding a setup.ini file and the result of an Office Profile Wizard (another Office Resource Kit tool) to the Office 2003 installation.
Do not use previous versions of the CIW, such as the Office XP version, for Office 2003. You'll need the new version to access new settings this release has in Outlook 2003 and in security features.

Why you need it

The Custom Installation Wizard tool is valuable when you have many Office 2003 installations that require specific settings. Obviously, it's easier to make one or more master files that will speed installation from a central administrative installation point or compressed CD image.

Download and installation

The Office 2003 Custom Installation Wizard is one of many tools in the Microsoft Office 2003 Resource Kit (ORK). You must download the entire resource kit (only 7.3 MB) from Microsoft's Web site. However, you can then perform a custom installation and only install the desired utilities.
To install, double-click Ork.exe. Accept the license agreement. The Setup screen will give you three choices:
  • Install Now (with the default installation)
  • Complete Installation
  • Custom Installation
If you only want to install the Custom Installation Wizard, choose Custom Installation. On the same screen, accept the default installation directory, or enter your own.
Setup will start next unless you choose Custom Installation. If you do, the Advanced Customization screen will appear. The format for choosing options is similar to an Office 2003 install. Drill down into each tool and select Run From My Computer, Run All From My Computer, or Not Available. Click Next to confirm your choices, then start installation.
Once installation is complete, the ORK tools will be available under Start | All Programs | Microsoft Office | Microsoft Office Tools | Microsoft Office 2003 Office Resource Kit. Figure A shows the result of installing the complete package.
Figure A
The ORK contains many useful tools, albeit buried deep in the Start menu.

Using the Custom Installation Wizard

Start the Wizard by selecting it from the Start menu. There are 24 configuration screens in the Wizard that walk you through just about every detail you could possibly configure. Depending upon your situation, not every screen will need to be changed. Further, note that you can click Finish any time. It's not necessary to set each screen.
In the first screen, set the location of the MSI file you will be transforming. This can be a file on the Office 2003 installation CD, i.e., D:\PRO11N.MSI. Next, choose to create a new MST file (you can also modify a previously created MST file in this step).
Now set the name and path of the new file, i.e., C:\OFC2003MST\defaultuser.mst. Note also that, beginning in this screen, a drop-down menu of all the Wizard's screens appears (Figure B). From here on, you can jump to any screen you need to access, rather than continually using the back or next buttons. Items not currently configurable are grayed out. For example, unless you opt to change the existing Outlook profile in screen 17, you won't be given the option to configure Exchange settings in screen 18.
Figure B
You can navigate through the Wizard using the drop-down menu that appears from Screen 4 on.
In the following screen, set the default path for installing Microsoft Office 2003 on the user's computer. The default installation path is <ProgramFiles>\Microsoft Office. You can also add the organization name here. But note that this is the only value that can't be overridden by a Setup.exe command line switch.
In the Remove Previous Versions screen, either accept the default behavior of removing all previous versions of Office found, or specify specific applications to remove or leave installed. By clicking the Details button, you can also specify which versions to remove. For example, highlight Word and click Details to include any or all previous versions of Word 95, 97, 2000, and 2002. While this is useful should you decide, say, to upgrade Word but not Outlook, make sure not to leave anything that will conflict with an Office 2003 install.
Next, the Set Feature Installation States allows you to modify every feature of Office 2003, just like a user would during a customized install. Except, in this case, you can also remove and lock features from later modifications. Features appear in the tree with the standard default installation options set. Drill down through the ones you need to change. The settings will vary depending on the feature chosen, from among:
  • Run From My Computer
  • Run All From My Computer
  • Run From Network
  • Run All From Network
  • Installed On First Use
  • Not Available
  • Not Available, Hidden, Locked
On this screen, a menu to the right allows you to set the following additional options per item or per branch in the tree:
  • Disable Run From Network
  • Disable Install On First Use
  • Do Not Migrate Previous Installation State
In the example shown in Figure C, Microsoft Access, as well as the Office Assistant and Microsoft Handwriting Component, have been set as Not Available, Hidden, Locked. In addition, the entire tree has been set to Do Not Migrate Previous Installation State.
Figure C
Setups based on this MST will not receive Access, the Office Assistant, or the Handwriting Component.
Further on in the Wizard, after you've entered a product key and created an Application Settings Profile, if desired, you can Change User Settings.
This detailed screen lets you configure any or all of the user options for all Office 2003 apps. For example, under Outlook 2003 you can change the default location for PST files. Needless to say, there are many choices here; I hope you won't need to change most of these.
The following screens highlight the level of detail you may address in a custom installation. For example, items 11-13 allow you to Add, Remove, and Modify other installation files, registry entries, and shortcuts, while Screen 14 allows you to set additional installation points to use if the default becomes unavailable.
With so many settings, what happens if one configuration set earlier in the Wizard conflicts with one set later? For example, Screen 15 permits you to change security settings. Some choices here are the same as those made in the User Settings dialog. If a setting conflicts, these rules of precedence come into play:
  1. Properties set on the Modify Setup Properties page override any corresponding options that you set on previous pages.
  2. However, if you also include a setup.ini file, those values take precedence over the MST file.
  3. Finally, command line options overrule any other conflicting values.
Remember, there is one exception to these rules: Entering the Company Name in the MST file takes precedence over both Setup.ini files and Setup.exe command line options.
For the purposes of this article, it's not necessary to discuss the remaining screens in detail. Configure them as needed. When you are done, click Finish. Your MST file is then saved to the location you specified. You can use the MST file as a template for other files and you can modify it as needed. To do so, start the Custom Installation Wizard and simply point it to this file.

Running Setup with an MST file

The following command line example orders Setup.exe to incorporate the MST file just created, and to run it in quiet mode (no user input or messages):
setup.exe TRANSFORMS=C:\OFC2003MST\defaultuser.mst /qb-
READ MORE »

VBS Script to install SCCM 2012 Client


The following script is usefull toinstall SCCM 2012 client. You can also include it in a standard GPO: it checks first if the client is already installed in the machine:


Option Explicit

On Error Resume Next

Dim FICHERO, MAQUINA
Dim strServiceSCCM,strServiceFramework
Dim objNETWORK, objFSO, objShell,objSysEnv
Dim strSMS_InstallPath, strSMS_Parameters
Dim strReinstallService

Set objNETWORK = WScript.CreateObject("WScript.NETWORK" )
Set objFSO = CreateObject("Scripting.FileSystemObject" )
Set objShell = WScript.CreateObject("WScript.Shell" )
Set objSysEnv = objShell.Environment("Process" )

strServiceSCCM = "CcmExec"


strSMS_InstallPath = "\\@Servername@\client$\ccmsetup.exe"
strSMS_Parameters = "SMSSITECODE=PLM"


MAQUINA = objNETWORK.COMPUTERNAME

'    If isServiceRunning(strServiceSCCM) = False Then
'    objShell.Run strSMS_InstallPath & " " & strSMS_Parameters, 1, True
'    strReinstallService = strReinstallService  & " | " & strServiceSCCM
'    End If

If objFSO.FolderExists(objSysEnv("SYSTEMROOT" )&"\CCM" ) Then
    ' Check for an SMS executable
    If ObjFSO.FileExists(objSysEnv("SYSTEMROOT" )&"\CCM\CcmExec.exe" ) Then
        Wscript.quit
    End If
End If

objShell.Run strSMS_InstallPath & " " & strSMS_Parameters, 1, True

SET FICHERO = objFSO.opentextfile ("\\@Servername@\client$\ccmsetup\client$\result.txt",8, TRUE)
    FICHERO.WRITELINE MAQUINA & " -- " & Now & strReinstallService

FICHERO.CLOSE


' Function to check if a service SCCM is running
Function isServiceRunning(strService)
    Dim objWMIService, strWMIQuery

    strWMIQuery = "Select * from Win32_Service Where Name = '" & strService & "' and state='Running'"

    Set objWMIService = GetObject("winmgmts:{impersonationLevel=impersonate}!\\.\root\cimv2")

    If objWMIService.ExecQuery(strWMIQuery).Count > 0 Then
        isServiceRunning = True
    Else
        isServiceRunning = False
    End If

End Function
READ MORE »

Deploy Mozilla Firefox with SCCM 2012


How to deploy Firefox using SCCM 2012. I am going to use the Extended Support Release (ESR) version of Firefox but this tutorial will work just fine with regular 32-bit or 64-bit Firefox as well. I like to get the ESR because this is the Mozilla recommended version for businesses and you can learn more about Mozilla Firefox ESR here:
Firefox ESR FAQ
You can download the latest Firefox ESR from the following link:
www.mozilla.org/en-US/firefox/organizations/all/
Or, if you prefer a regular version, you can get that from this link:
www.mozilla.org/en-US/firefox/all/
In this tutorial we will deploy Firefox with some preconfigured settings, like: suppressing any welcome page, accepting EULA, default homepage, remove older version.
Step-1: Download the latest ESR Firefox (or whichever version of Firefox you prefer) available from the following link and share the file on your network share folder:
I personally recommend Firefox ESR since this version is meant for businesses as it supports mass deployment and I found it more stable, regardless you can use a regular version of Firefox using this tutorial. There’s no difference in user experience or functionality.
Download Firefox ESR
Step-2: Create a new text file called ‘override.ini’ in the same folder and copy in the following information:
[XRE]
EnableProfileMigrator=false

Create override.ini file
Step-3: Create a second text file called ‘mozilla.cfg‘ and paste the following information in it:

//Firefox Default Settings

// set Firefox Default homepage
pref(“browser.startup.homepage”,”http://www.ohoque.com/”);
// disable default browser check
pref(“browser.shell.checkDefaultBrowser”, false);
pref(“browser.startup.homepage_override.mstone”, “ignore”);
// disable application updates
pref(“app.update.auto”, false)
pref(“app.update.enabled”, false)
// disables the ‘know your rights’ button from displaying on first run
pref(“browser.rights.3.shown”, true);
// disables the request to send performance data from displaying
pref(“toolkit.telemetry.prompted”, 2);
pref(“toolkit.telemetry.rejected”, true);
// disable history, download, cache, password and settings
pref(“browser.privatebrowsing.autostart”, true)
// clear cookies
pref(“privacy.clearOnShutdown.cookies”, true)
Create config file
Create config file
Step-4: Create a third text file called ‘install.cmd’ and paste the following information:

@echo off
REM==========================================
REM Install FireFox 31.5.0 ESR
REM==========================================
REM Date : 3 March, 2015
REM Author : Risalatul Hoque (Source: mockbox.net)
REM .
REM Script Details:
REM --------------
REM This script will:
REM + silently install or upgrade Firefox 31.5 ESR WITHOUT Firefox being the default browser
REM + Disables the 'Automatically check for updates' option
REM + Disables the 'Always check to see if Firefox is the default browser on startup' option
REM + Runs in private browsing by default
REM + Disables the Import Wizard
REM + Works for Windows XP / 7 /8 32-bit and 64-bit
REM .
REM===========================================
echo Installing Firefox - Please Wait.
echo Window will close after install is complete

REM Install Firefox
“%~dp0Firefox Setup 31.5.0esr.exe” -ms
REM Install 32-bit customisations
if exist “%programfiles%\Mozilla Firefox\” copy /Y “%~dp0override.ini” “%programfiles%\Mozilla Firefox\browser\”
if exist “%programfiles%\Mozilla Firefox\” copy /Y “%~dp0mozilla.cfg” “%programfiles%\Mozilla Firefox\”
if exist “%programfiles%\Mozilla Firefox\” copy /Y “%~dp0local-settings.js” “%programfiles%\Mozilla Firefox\defaults\pref”
REM Install 64-bit customisations
if exist “%ProgramFiles(x86)%\Mozilla Firefox\” copy /Y “%~dp0override.ini” “%ProgramFiles(x86)%\Mozilla Firefox\browser\”
if exist “%ProgramFiles(x86)%\Mozilla Firefox\” copy /Y “%~dp0mozilla.cfg” “%ProgramFiles(x86)%\Mozilla Firefox\”
if exist “%ProgramFiles(x86)%\Mozilla Firefox\” copy /Y “%~dp0local-settings.js” “%ProgramFiles(x86)%\Mozilla Firefox\defaults\pref”
REM Return exit code to SCCM
exit /B %EXIT_CODE%
Create batch file
Create batch file
IMPORTANT: If you’re using a different version of Firefox, make sure to adjust the batch file accordingly. You will almost always need to change the following line with the appropriate file/version name:
"%~dp0Firefox Setup 31.5.0esr.exe" -ms
Step-5: Create the fourth and final text file called ‘local-settings.js’ and paste in the following information:
pref("general.config.obscure_value", 0);
pref("general.config.filename", "mozilla.cfg");

Create local-settings.js file
Step-6: Make sure, Firefox .exe and the four files created above are within the same folder and your deployment folder from the network share should look similar to this:
Network share folder should have these files
You have all the files you need to create the package using SCCM. Let’s head over to SCCM and create our package.
Step-7: Go to SCCM > Software Library > Application Management > Packages. Right click on Packages and select Create Package.
Deploy Firefox using SCCM 2012
Step-8: Specify some application details and description. Check box This package contains source files and browse to the folder using UNC where the Firefox ESR resides. Click OK. Click Next.
Package description
Package description
Step-9: Standard Program should be selected by default. Click Next.
Firefox Deployment
Firefox Deployment
Step-10: Fill in with some package details. Browse for Command line and select install.cmd (you might have to change browse pattern to *.* all file types). We’ll select Run as Hidden, Program can run as Whether or not a user is logged on. Click Next.
Firefox Deployment using SCCM 2012
Step-11: In this window, we can specify if the program is compatible for all versions or some specific OS versions. Since I got all Windows 7 computers in my environment, it doesn’t matter much for me and I will just click Next. But if you have a diverse group of computers with different kinds of OS’s, you might want to take care of this step accordingly. But either way, this step is optional and I am going to accept the default setting. Click Next.
SCCM Firefox Deployment
Step-12: Click Next.
Click Next
Click Next
Step-13: Click Close.
Click Close
Click Close
Step-14: Now we’ll need to distribute the content. Right click on the Firefox package we just created and select Distribute Content.
Distribute Content
Distribute Content
Step-15: Click Next.
Click Next
Click Next
Step-16: Click Add and check the Distribution Point where you want to distribute this package. Click Next.
Firefox Deployment using SCCM 2012: Distribute Content
Step-17: Click Next.
Click Next
Click Next
Step-18: Click Close.
Firefox Deployment using SCCM 2012: Done Distributing Content!
Step-19: Now that your package has been distributed, it’s ready for deployment. Right click on the package and select Deploy.
Firefox Deployment using SCCM 2012: The Actual Deployment
Step-20: Click Browse and select the collection or machine where you want to deploy this package. Click Next.
Deployment continues...
Deployment continues…
Step-21: Click Next.
Click Next
Click Next
Step-22: Select Action as Install (default) and Purpose Required. Click Next.
SCCM 2012: Firefox Deployment
Step-23: In this window, you will get to schedule your deployment. For simplicity’s sake, I am going to make my deployment available ASAP. Click New. Check Assign immediately after this event: and select As soon as possible. Click OK.
Schedule Firefox Deployment using SCCM 2012
Step-24: Click Next.
Click Next
Click Next
Step-25: Click Next.
Click Next
Click Next
Step-26: Click Next.
Click Next
Click Next
Step-27: Click Next.
Click Next
Click Next
Step-28: Click Close.
Congratulations! You just deployed Firefox using SCCM!
And that’s it! If you need any clarification or help understanding any of the above steps, please do feel free to ask question in the comment section and I’ll get back to you as soon as I can. Hope this tutorial was helpful.
READ MORE »